

Smartphones are essential in 2025. From work to entertainment, social networking, and personal management, we rely on these devices constantly. But even the most advanced devices are not immune to accidental drops, battery wear, screen scratches, and minor hardware issues.
While major repairs should be handled by professionals like Smart Electronix, having a DIY home repair kit can help you manage small, non-critical issues safely. With the right tools, preparation, and knowledge, you can fix minor problems without voiding warranties or causing damage.
This guide will walk you through what you need, how to set it up, and safety tips to create a smartphone repair toolkit that every Aussie tech enthusiast should have.
🔧 1️⃣ Why a DIY Smartphone Repair Kit Matters
A well-prepared kit helps you:
-
Fix minor issues quickly — like a loose charging port, cracked screen protector, or battery replacement.
-
Save money — by handling small repairs at home instead of paying for every minor service.
-
Prevent damage — using proper tools reduces the risk of scratches or component breakage.
-
Stay prepared — sudden problems like stuck SIM trays or jammed buttons can be handled immediately.
In 2025, with foldable devices, USB-C ports, and advanced batteries, having the right tools is more important than ever.
🧰 2️⃣ Essential Tools for Your DIY Smartphone Repair Kit
Here are the basic and advanced tools you’ll need:
Basic Tools
-
Precision Screwdriver Set
-
Includes Phillips, Pentalobe, Torx, and flathead bits.
-
Essential for opening screws on iPhones, Androids, and laptops.
-
-
Plastic Pry Tools / Spudgers
-
Prevent scratches on screens and frames.
-
Useful for separating glued screens safely.
-
-
Tweezers
-
Fine-tip, anti-static tweezers for handling small components like screws and connectors.
-
-
SIM Card Ejector Tool
-
Essential for removing SIM or microSD cards safely.
-
-
Suction Cup
-
Helps lift glass screens or back panels without cracking them.
-
-
Microfiber Cloth
-
For cleaning screens, lenses, and components without leaving scratches.
-
Intermediate Tools
-
Anti-Static Mat & Wrist Strap
-
Protects sensitive circuits from electrostatic discharge (ESD).
-
Essential for opening your smartphone safely.
-
-
Plastic Opening Picks
-
Used for separating tightly sealed screens.
-
Reduces the risk of damaging thin OLED or foldable panels.
-
-
Precision Knife / Razor Blade
-
Helps remove stubborn adhesive or protectors carefully.
-
Advanced Tools
-
Heat Gun / iOpener
-
Softens adhesive on screens and batteries.
-
Prevents cracking or warping while opening devices.
-
-
Magnetic Mat / Screw Organizer
-
Keeps tiny screws in place and prevents loss.
-
-
Battery Tester / Multimeter
-
Measures voltage, continuity, and battery health.
-
-
Spare Replacement Parts
-
Screens, charging ports, buttons, adhesive strips, and batteries.
-
Only purchase OEM or verified third-party parts.
-
⚠️ 3️⃣ Safety Tips for Home Repairs
Even small DIY repairs can cause damage or safety risks. Follow these guidelines:
-
Turn off your phone completely before opening.
-
Remove the battery if possible, or disconnect it safely.
-
Work in a clean, dust-free area with good lighting.
-
Avoid metal tools near exposed circuits to prevent short-circuits.
-
Use anti-static wrist straps to protect chips and boards.
-
Handle screens and glass parts carefully to prevent cuts.
-
Do not attempt advanced repairs like motherboard replacement or liquid damage restoration at home — leave these to professionals.
🛠️ 4️⃣ How to Organize Your DIY Repair Kit
Organization is key for efficiency:
-
Use a small toolbox or drawer organizer with compartments.
-
Label tools and spare parts to avoid confusion.
-
Keep delicate tools separate to prevent damage.
-
Regularly check that your kit has no missing or worn-out tools.
At Smart Electronix, we recommend having one kit per device type — especially if you own multiple smartphones or tablets.
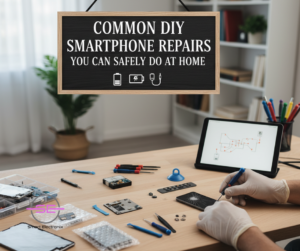
🔍 5️⃣ Common DIY Smartphone Repairs You Can Safely Do at Home
Here are some examples of repairs you can attempt safely:
-
Screen Protector or Glass Replacement
-
Replace cracked glass or tempered protector using suction cups, pry tools, and adhesive strips.
-
-
Battery Replacement
-
Swap out old batteries with OEM replacements using heat tools and spudgers.
-
-
Charging Port Cleaning or Replacement
-
Remove lint or debris from USB-C or Lightning ports using soft brushes.
-
-
SIM Tray Replacement or Adjustment
-
Easy to do with an ejector tool and tweezers.
-
-
Button or Housing Cleaning
-
Remove dirt from volume, power, or home buttons to restore proper functionality.
-
Pro Tip: Always test functionality before sealing the device fully.
💡 6️⃣ When to Seek Professional Help
Some repairs should never be DIY:
-
Motherboard issues or short circuits
-
Water damage beyond minor exposure
-
Foldable phone internal repairs
-
Camera or lens module replacement in high-end devices
-
Firmware bricking or update-related failures
At Smart Electronix, our certified technicians can handle these safely, ensuring your device is restored without further damage.
🌟 7️⃣ Smart Electronix Tips for Maintaining Your DIY Kit
-
Update your toolkit every 12 months with fresh adhesive, thermal pads, and tools.
-
Invest in high-quality parts — cheap tools or knock-off replacements can cause permanent damage.
-
Keep a reference guide or tutorial bookmarks for model-specific instructions.
-
Use anti-static storage bags for delicate components like motherboards or screens.
✅ 8️⃣ Final Thoughts
A DIY smartphone repair kit can save you time and money — but only if used wisely. Small fixes, maintenance tasks, and cleaning are perfect DIY projects. But when it comes to complex repairs, folded devices, water damage, or firmware issues, professional services are the safest choice.
Smart Electronix helps Australians balance DIY convenience with professional support. From repair tips to certified services, we ensure your smartphones stay functional, safe, and long-lasting.
Start with the right tools, follow safety protocols, and make your DIY repair kit a reliable extension of your tech care routine.